


Send Separate Signature Requests with a CSV
Prepare a Sign.Plus template and recipient CSV for individual signature requests. Check headers, addresses and document details before sending a batch.


- Bulk Send creates individual signing requests from a template. Use a normal multi-recipient request when everyone must sign the same agreement.
- Sign.Plus documents Bulk Send for Business and Enterprise plans on the web app.
- Use the CSV downloaded for the selected template, leave its headers unchanged and keep within the documented 100-row maximum.
- Check the template, recipients and any variables before sending. One incorrect source file can repeat the same mistake across the batch.
Use a batch when each person needs an individual request
Bulk Send is useful when you need separate signature requests based on the same prepared document. Start with the right template, download its CSV and fill in the intended recipients. The CSV prepares a batch of requests; it does not make one person sign many documents automatically.
If the parties all need to execute one shared agreement, use a request with multiple signers and the appropriate order instead. A company-wide policy acknowledgment and a lease signed by several parties have different routing needs.
Check the template before opening the spreadsheet
Review the version, clauses, fields and recipient roles in the template. Make sure the document is suitable for every person in this batch. When details vary, decide which can be supplied through supported dynamic fields and which require a different document.
An Ohio HR team is collecting an acknowledgment of a new expense policy from 60 employees. Each employee needs their own request and completed record. The HR team checks the policy version once, then checks each employee's recipient details before preparing the batch.
A template is reusable preparation, not a reason to skip review. An old policy date or a field assigned to the wrong role can be repeated across all requests.
Prepare the CSV from Sign.Plus
Bulk Send is documented for Business and Enterprise plans, using the web app. In Templates, open the chosen template's menu and select Bulk Send. Follow the documented CSV preparation flow and use the file it provides.
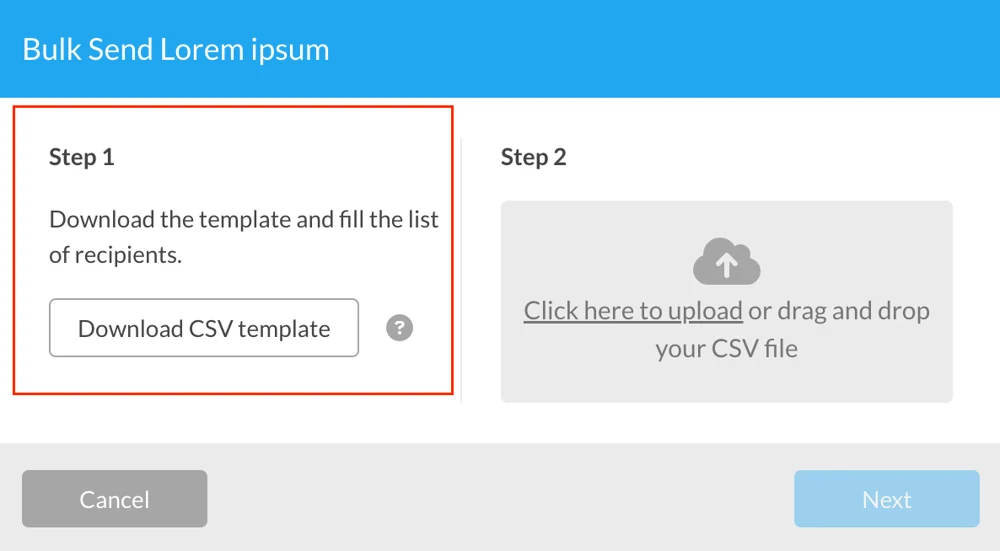
- Keep the downloaded headers. Do not replace them with your own contact-list column names.
- Enter only the intended recipients. Check names against email addresses and remove accidental duplicates.
- Respect the batch limit. The documented maximum is 100 rows. Split a larger list into clearly named batches.
- Preserve CSV formatting. Save as CSV, then reopen the file to check that names, addresses and columns remain in the right places.
- Review template-specific values. If the template uses variables, use the corresponding generated structure and verify each value against the correct recipient.
Do not invent column names or copy a CSV from an unrelated template. Treat the downloaded file as the format for this batch. A spreadsheet that looks tidy can still contain a shifted column, an extra row or an address copied from the wrong employee.
Review three things before sending
| Review | What to catch | Useful check |
|---|---|---|
| Document | Wrong version, missing page or stale policy text | Read the selected template and any variable values |
| Recipient | Address mismatch, unintended duplicate or a person outside the batch | Compare the final CSV against the approved recipient list |
| Request | Wrong destination folder or unclear batch identity | Review the prepared request and record which list and template version were used |
When a workflow is new, first validate the template and recipient mapping with controlled, authorized test recipients before using the operational list. Only send the production batch when someone responsible has checked both the document and the list.
Track completion at the individual-request level
After sending, check outstanding requests under Pending and finished requests under Completed. A batch can contain both at the same time. One person's completion does not complete everyone else's request.
Use a simple internal control list to reconcile the intended recipients with completed records. If someone did not receive the invitation or their request stopped, investigate that request's status before repeating the whole batch.
If the template itself was wrong, identify the affected requests and follow a versioned correction process. Avoid a second live batch that leaves recipients uncertain which document to use.
As each request completes, retain the signed file and its evidence with the right employee or transaction reference. Keep the source list in an appropriately restricted location; it contains recipient information and is not a public reporting file.
FAQs
What is the difference between Bulk Send and multiple signers?

Bulk Send prepares separate requests from a template for individual recipients. A multi-signer request collects the required signatures on the same agreement. Choose the workflow according to whether people need their own record or must execute one shared document.
How many rows can a Sign.Plus Bulk Send CSV contain?
The documented maximum is 100 rows. Use the CSV supplied for the selected template and do not change its headers. Review larger recipient lists in separate, clearly identified batches.
Does Bulk Send sign documents for the recipients?
No. It prepares and sends signature requests in a batch. Each recipient still needs to complete the signing actions required for their request.

Related guides





Confédération Suisse
Confederazione Svizzera
Confederaziun Svizra
スイス連邦
Innosuisse - スイスイノベーション機関


